数据源(Data Source)插件是 Dify 1.9.0 新引入的一种插件类型。在知识流水线(Knowledge Pipeline)中,其作为文档数据的来源并充当整个流水线的起始点。
本文介绍如何开发数据源插件(包括插件结构、代码示例、调试方法等),帮助你快速完成插件开发与上线。
前置准备
在阅读本文之前,请确保你对知识流水线的流程有基本的了解,并且具有一定的插件开发知识。你可以在以下文档找到相关内容:
数据源插件类型
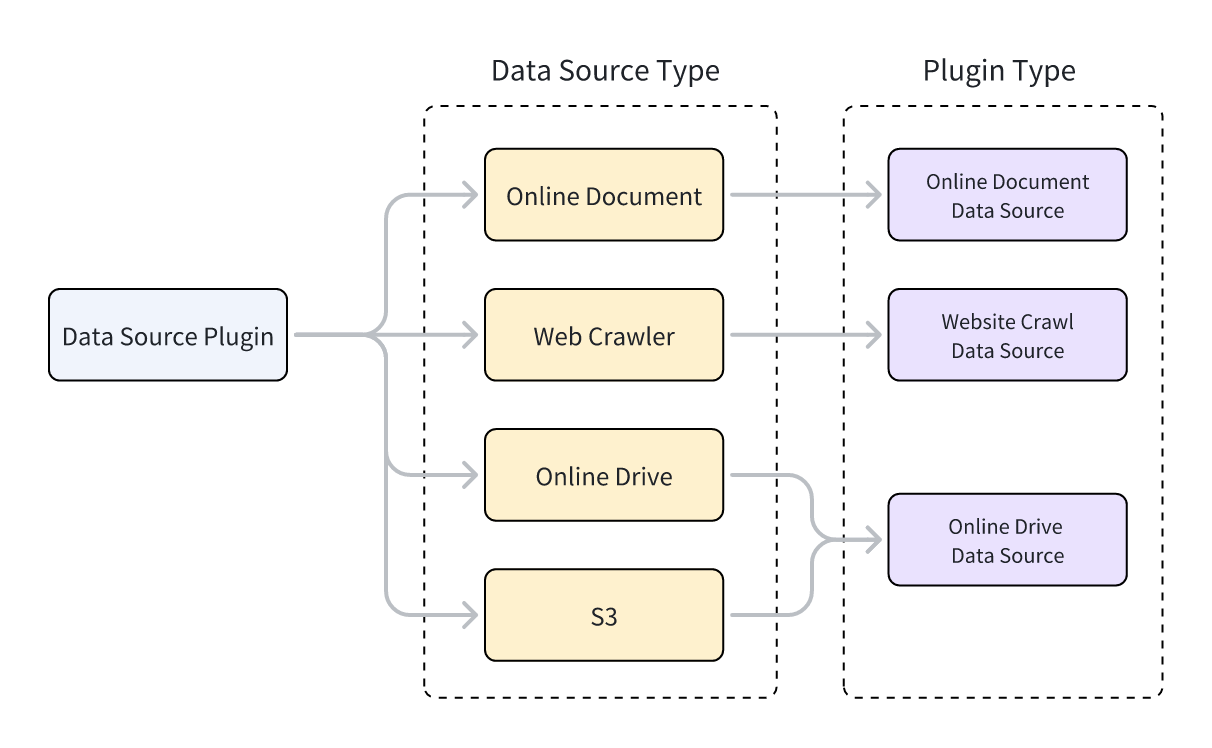
Dify 支持三种数据源插件:网页爬虫、在线文档和在线网盘。在具体实现插件代码时,实现插件功能的类需要继承不同的数据源类,三种插件类型对应三种父类。
每个数据源插件类型支持配置多种数据源,例如:
- 网页爬虫:Jina Reader,FireCrawl
- 在线文档:Notion,Confluence,GitHub
- 在线网盘:Onedrive,Google Drive,Box,AWS S3,Tencent COS
数据源类型与数据源插件类型的关系如下图所示:

开发插件
创建数据源插件
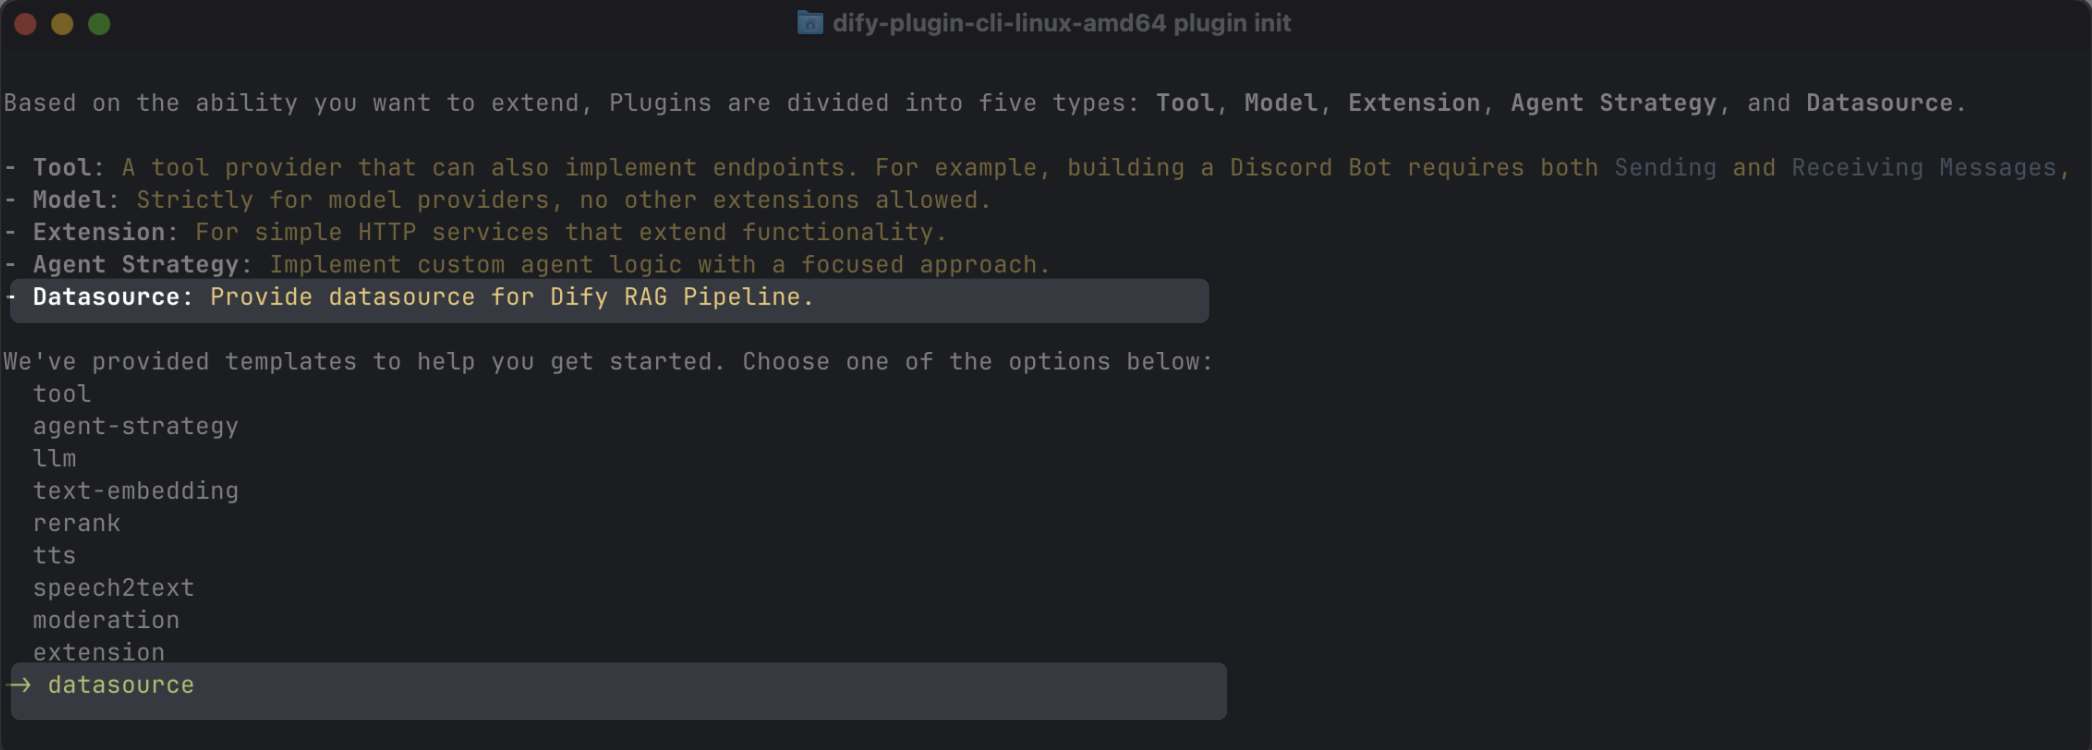
你可以使用脚手架命令行工具来创建数据源插件,并选择 datasource 类型。完成设置后,命令行工具将自动生成插件项目代码。

一般情况下,数据源插件不使用 Dify 平台的其他功能,因此无需为其设置额外权限。
数据源插件结构
数据源插件包含三个主要部分:
manifest.yaml 文件:描述插件的基本信息provider 目录:包含插件供应商的描述与实现鉴权的代码datasources 目录:包含实现获取数据源核心逻辑的描述与代码
├── _assets
│   └── icon.svg
├── datasources
│   ├── your_datasource.py
│   └── your_datasource.yaml
├── main.py
├── manifest.yaml
├── PRIVACY.md
├── provider
│   ├── your_datasource.py
│   └── your_datasource.yaml
├── README.md
└── requirements.txt
设置正确的版本及标签
-
在
manifest.yaml 文件中,插件支持的最低 Dify 版本需设置如下:
minimum_dify_version: 1.9.0
-
在
manifest.yaml 文件中,需为插件添加如下数据源标签,使插件在 Dify Marketplace 中以数据源分类展示:
-
在
requirements.txt 文件中,插件开发使用的插件 SDK 版本需设置如下:
dify-plugin>=0.5.0,<0.6.0
添加供应商
创建供应商 YAML 文件
供应商 YAML 文件的定义和编写与工具插件基本相同,仅有以下两点差异:
# 指定数据源的 provider 类型,可设置为 online_drive,online_document 或 website_crawl
provider_type: online_drive # online_document, website_crawl

# 指定数据源
datasources:
  - datasources/PluginName.yaml
创建供应商代码文件
-
若使用 API Key 认证模式,数据源插件的供应商代码文件与工具插件完全相同,仅需将供应商类继承的父类修改为
DatasourceProvider 即可。
class YourDatasourceProvider(DatasourceProvider):

    def _validate_credentials(self, credentials: Mapping[str, Any]) -> None:
        try:
            """
            IMPLEMENT YOUR VALIDATION HERE
            """
        except Exception as e:
            raise ToolProviderCredentialValidationError(str(e))
-
若使用 OAuth 认证模式,数据源插件则与工具插件略有不同。使用 OAuth 获取访问权限时,数据源插件可同时返回用户名和头像并显示在前端。因此,
_oauth_get_credentials 和 _oauth_refresh_credentials 需要返回包含 name、avatar_url、expires_at 和 credentials 的 DatasourceOAuthCredentials 类型。
-
DatasourceOAuthCredentials 类的定义如下,返回时需设置为对应的类型:
class DatasourceOAuthCredentials(BaseModel):
    name: str | None = Field(None, description="The name of the OAuth credential")
    avatar_url: str | None = Field(None, description="The avatar url of the OAuth")
    credentials: Mapping[str, Any] = Field(..., description="The credentials of the OAuth")
    expires_at: int | None = Field(
        default=-1,
        description="""The expiration timestamp (in seconds since Unix epoch, UTC) of the credentials.
        Set to -1 or None if the credentials do not expire.""",
    )
-
_oauth_get_authorization_url,_oauth_get_credentials 和 _oauth_refresh_credentials 的函数签名如下:
def _oauth_get_authorization_url(self, redirect_uri: str, system_credentials: Mapping[str, Any]) -> str:
"""
Generate the authorization URL for {{ .PluginName }} OAuth.
"""
try:
    """
    IMPLEMENT YOUR AUTHORIZATION URL GENERATION HERE
    """
except Exception as e:
    raise DatasourceOAuthError(str(e))
return ""
添加数据源
三种数据源插件需要创建的 YAML 文件格式与数据源代码格式有所不同,下面将分别介绍。
网络爬虫(Web Crawler)
在网页爬虫类插件的供应商 YAML 文件中, output_schema 需固定返回四个参数:source_url、content、title 和 description。
output_schema:
    type: object
    properties:
      source_url:
        type: string
        description: the source url of the website
      content:
        type: string
        description: the content from the website
      title:
        type: string
        description: the title of the website
      "description":
        type: string
        description: the description of the website
WebsiteCrawlDatasource 类并实现 _get_website_crawl 方法,然后使用 create_crawl_message 方法返回网页爬虫消息。
如需爬取多个网页并分批返回,可将 WebSiteInfo.status 设置为 processing,然后使用 create_crawl_message 方法返回每一批网页爬虫消息。当所有网页均爬取完成后,再将 WebSiteInfo.status 设置为 completed。
class YourDataSource(WebsiteCrawlDatasource):

    def _get_website_crawl(
        self, datasource_parameters: dict[str, Any]
    ) -> Generator[ToolInvokeMessage, None, None]:

        crawl_res = WebSiteInfo(web_info_list=[], status="", total=0, completed=0)
        crawl_res.status = "processing"
        yield self.create_crawl_message(crawl_res)

        ### your crawl logic
           ...
        crawl_res.status = "completed"
        crawl_res.web_info_list = [
            WebSiteInfoDetail(
                title="",
                source_url="",
                description="",
                content="",
            )
        ]
        crawl_res.total = 1
        crawl_res.completed = 1

        yield self.create_crawl_message(crawl_res)
在线文档(Online Document)
在线文档类插件的返回值至少需包含 content 字段用于表示文档内容,示例如下:
output_schema:
    type: object
    properties:
      workspace_id:
        type: string
        description: workspace id
      page_id:
        type: string
        description: page id
      content:
        type: string
        description: page content
OnlineDocumentDatasource 类并实现 _get_pages 和 _get_content 两个方法。当用户运行插件时,首先通过 _get_pages 方法获取文档列表;当用户从列表中选择某个文档后,再通过 _get_content 方法获取文档内容。
def _get_pages(self, datasource_parameters: dict[str, Any]) -> DatasourceGetPagesResponse:
    # your get pages logic
    response = requests.get(url, headers=headers, params=params, timeout=30)
    pages = []
    for item in  response.json().get("results", []):
        page = OnlineDocumentPage(
            page_name=item.get("title", ""),
            page_id=item.get("id", ""),
            type="page",
            last_edited_time=item.get("version", {}).get("createdAt", ""),
            parent_id=item.get("parentId", ""),
            page_icon=None,
        )
        pages.append(page)
    online_document_info = OnlineDocumentInfo(
        workspace_name=workspace_name,
        workspace_icon=workspace_icon,
        workspace_id=workspace_id,
        pages=[page],
        total=pages.length(),
    )
    return DatasourceGetPagesResponse(result=[online_document_info])
在线网盘(Online Drive)
在线网盘类插件的返回值类型为一个文件,需遵循以下规范:
output_schema:
    type: object
    properties:
      file:
        $ref: "https://dify.ai/schemas/v1/file.json"
OnlineDriveDatasource 类并实现 _browse_files 和 _download_file 两个方法。
当用户运行插件时,首先通过 _browse_files 方法获取文件列表。此时 prefix 为空,表示获取根目录下的文件列表。文件列表中包含文件夹与文件两种类型的变量。当用户继续打开文件夹时,将再次运行 _browse_files 方法。此时, OnlineDriveBrowseFilesRequest 中的 prefix 为文件夹 ID,用于获取该文件夹内的文件列表。
当用户选择某个文件后,插件通过 _download_file 方法和文件 ID 获取文件内容。你可以使用 _get_mime_type_from_filename 方法获取文件的 MIME 类型,以便在流水线中对不同的文件类型进行不同的处理。
当文件列表包含多个文件时,可将 OnlineDriveFileBucket.is_truncated 设置为 True,并将OnlineDriveFileBucket.next_page_parameters 设置为继续获取文件列表的参数,如下一页的请求 ID 或 URL,具体取决于不同的服务商。
_browse_files
_download_file
def _browse_files(
self, request: OnlineDriveBrowseFilesRequest
) -> OnlineDriveBrowseFilesResponse:

credentials = self.runtime.credentials
bucket_name = request.bucket
prefix = request.prefix or ""  # Allow empty prefix for root folder; When you browse the folder, the prefix is the folder id
max_keys = request.max_keys or 10
next_page_parameters = request.next_page_parameters or {}

files = []
files.append(OnlineDriveFile(
    id="",
    name="",
    size=0,
    type="folder" # or "file"
))

return OnlineDriveBrowseFilesResponse(result=[
    OnlineDriveFileBucket(
        bucket="",
        files=files,
        is_truncated=False,
        next_page_parameters={}
    )
])
prefix,bucket 和 id 变量有特殊的使用方法,可在实际开发中按需灵活应用:
prefix:表示文件路径前缀,例如 prefix=container1/folder1/ 表示获取 container1 桶下的 folder1 文件夹中的文件或文件列表。bucket:表示文件桶,例如 bucket=container1 表示获取 container1 桶下的文件或文件列表(若是非标准 S3 协议网盘,该字段可为空 )。id:由于_download_file 方法不使用 prefix 变量,需将文件路径拼接到 id 中,例如 id=container1/folder1/file1.txt 表示获取 container1 桶下的 folder1 文件夹中的 file1.txt 文件。
调试插件
数据源插件支持两种调试方式:远程调试或安装为本地插件进行调试。需注意:
- 若插件使用 OAuth 认证模式,其远程调试时的
redirect_uri 与本地插件的设置并不一致,需要修改服务商 OAuth App 的相关配置。
- 数据源插件支持单步调试,但为了保证功能的正确性,我们仍推荐你在完整的知识流水线中进行测试。
最终检查
在打包与发布前,确保已完成以下事项:
- 设置支持的最低 Dify 版本为
1.9.0
- 设置 SDK 版本为
dify-plugin>=0.5.0,<0.6.0
- 编写
README.md 和 PRIVACY.md 文件
- 确保代码文件中仅包含英文内容
- 将默认图标替换为数据源供应商 Logo
打包与发布
在插件目录执行以下命令,即可生成 .difypkg 插件包:
dify plugin package . -o your_datasource.difypkg
- 在你的 Dify 环境中导入并使用该插件
- 通过提交 Pull Request 的方式将插件发布到 Dify Marketplace
编辑此页面 | 提交问题 


